ASTM A418/A418M-24
(Practice)Standard Practice for Ultrasonic Examination of Turbine and Generator Steel Rotor Forgings
Standard Practice for Ultrasonic Examination of Turbine and Generator Steel Rotor Forgings
SIGNIFICANCE AND USE
4.1 This practice shall be used when ultrasonic inspection is required by the order or specification for inspection purposes where the acceptance of the forging is based on limitations of the number, amplitude, or location of discontinuities, or a combination thereof, which give rise to ultrasonic indications.
4.2 The acceptance criteria shall be clearly stated as order requirements.
SCOPE
1.1 This practice for ultrasonic examination covers turbine and generator steel rotor forgings covered by Specifications A469/A469M, A470/A470M, A768/A768M, and A940/A940M. This practice shall be used for contact testing only.
1.2 This practice describes a basic procedure of ultrasonically inspecting turbine and generator rotor forgings. It does not restrict the use of other ultrasonic methods such as reference block calibrations when required by the applicable procurement documents nor is it intended to restrict the use of new and improved ultrasonic test equipment and methods as they are developed.
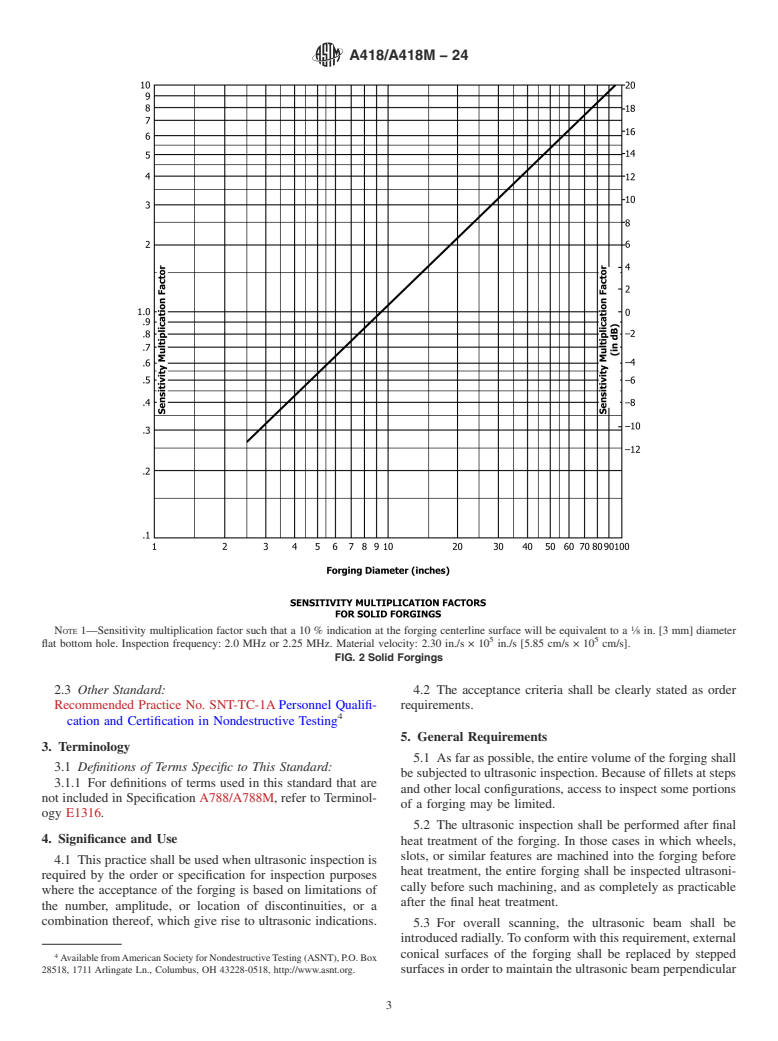
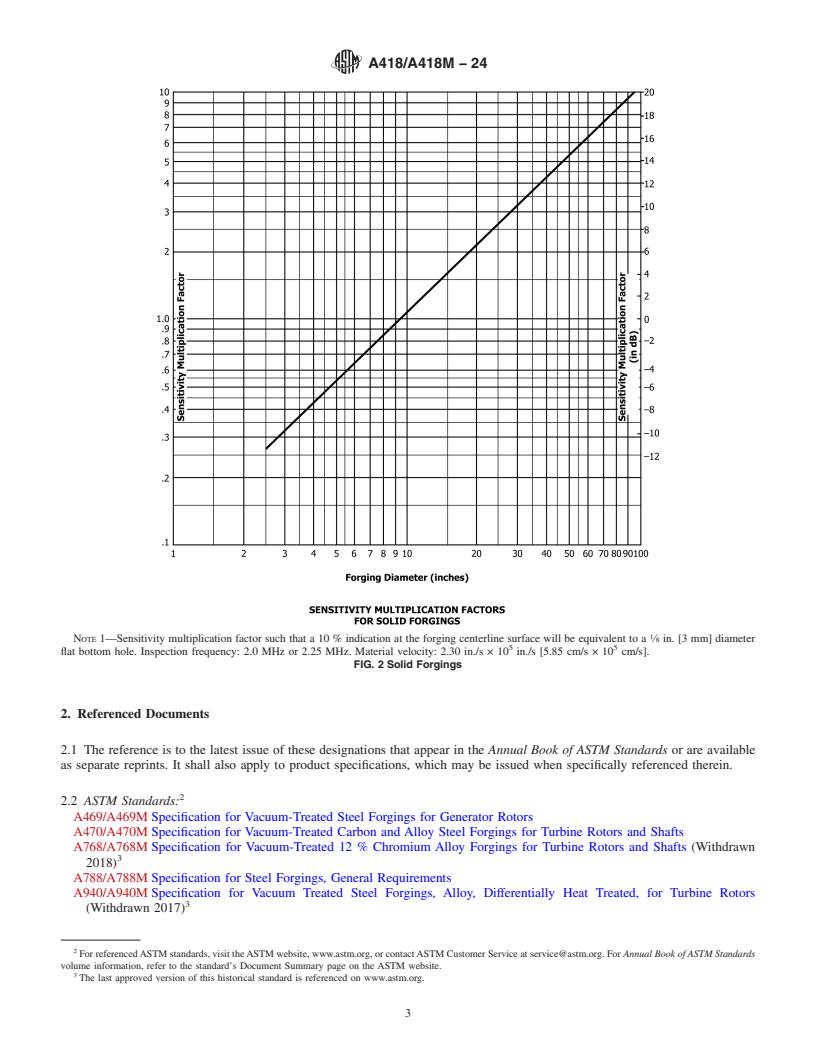
1.3 This practice is intended to provide a means of inspecting cylindrical forgings so that the inspection sensitivity at the forging center line or bore surface is constant, independent of the forging or bore diameter. To this end, inspection sensitivity multiplication factors have been computed from theoretical analysis, with experimental verification. These are plotted in Fig. 1 (bored rotors) and Fig. 2 (solid rotors), for a true inspection frequency of 2.25 MHz, and an acoustic velocity of 2.30 in./s × 105 in./s [5.85 cm/s × 105 cm/s]. Means of converting to other sensitivity levels are provided in Fig. 3. (Sensitivity multiplication factors for other frequencies may be derived in accordance with X1.1 and X1.2 of Appendix X1.)
FIG. 1 Bored Forgings
Note 1: Sensitivity multiplication factor such that a 10 % indication at the forging bore surface will be equivalent to a 1/8 in. [3 mm] diameter flat bottom hole. Inspection frequency: 2.0 MHz or 2.25 MHz. Material velocity: 2.30 in./s × 105 in./s [5.85 cm/s × 105 cm/s].
FIG. 2 Solid Forgings
Note 1: Sensitivity multiplication factor such that a 10 % indication at the forging centerline surface will be equivalent to a 1/8 in. [3 mm] diameter flat bottom hole. Inspection frequency: 2.0 MHz or 2.25 MHz. Material velocity: 2.30 in./s × 105 in./s [5.85 cm/s × 105 cm/s].
FIG. 3 Conversion Factors to Be Used in Conjunction with Fig. 1 and Fig. 2 if a Change in the Reference Reflector Diameter is Required
1.4 Considerable verification data for this method have been generated which indicate that even under controlled conditions very significant uncertainties may exist in estimating natural discontinuities in terms of minimum equivalent size flat-bottom holes. The possibility exists that the estimated minimum areas of natural discontinuities in terms of minimum areas of the comparison flat-bottom holes may differ by 20 dB (factor of 10) in terms of actual areas of natural discontinuities. This magnitude of inaccuracy does not apply to all results but should be recognized as a possibility. Rigid control of the actual frequency used, the coil bandpass width if tuned instruments are used, and so forth, tend to reduce the overall inaccuracy which is apt to develop.
1.5 This practice for inspection applies to solid cylindrical forgings having outer diameters of not less than 2.5 in. [64 mm] nor greater than 100 in. [2540 mm]. It also applies to cylindrical forgings with concentric cylindrical bores having wall thicknesses of 2.5 [64 mm] in. or greater, within the same outer diameter limits as for solid cylinders. For solid sections less than 15 in. [380 mm] in diameter and for bored cylinders of less than 7.5 in. [190 mm] wall thickness the transducer used for the inspection will be different than the transducer used for larger sections.
1.6 Supplementary requirements of an optional nature are provided for use at the option of the...
General Information
Relations
Buy Standard
Standards Content (Sample)
This international standard was developed in accordance with internationally recognized principles on standardization established in the Decision on Principles for the
Development of International Standards, Guides and Recommendations issued by the World Trade Organization Technical Barriers to Trade (TBT) Committee.
Designation: A418/A418M − 24
Standard Practice for
Ultrasonic Examination of Turbine and Generator Steel
1
Rotor Forgings
This standard is issued under the fixed designation A418/A418M; the number immediately following the designation indicates the year
of original adoption or, in the case of revision, the year of last revision. A number in parentheses indicates the year of last reapproval.
A superscript epsilon (´) indicates an editorial change since the last revision or reapproval.
1. Scope* should be recognized as a possibility. Rigid control of the
actual frequency used, the coil bandpass width if tuned
1.1 This practice for ultrasonic examination covers turbine
instruments are used, and so forth, tend to reduce the overall
and generator steel rotor forgings covered by Specifications
inaccuracy which is apt to develop.
A469/A469M, A470/A470M, A768/A768M, and A940/
A940M. This practice shall be used for contact testing only.
1.5 This practice for inspection applies to solid cylindrical
forgings having outer diameters of not less than 2.5 in.
1.2 This practice describes a basic procedure of ultrasoni-
[64 mm] nor greater than 100 in. [2540 mm]. It also applies to
cally inspecting turbine and generator rotor forgings. It does
cylindrical forgings with concentric cylindrical bores having
not restrict the use of other ultrasonic methods such as
wall thicknesses of 2.5 [64 mm] in. or greater, within the same
reference block calibrations when required by the applicable
outer diameter limits as for solid cylinders. For solid sections
procurement documents nor is it intended to restrict the use of
less than 15 in. [380 mm] in diameter and for bored cylinders
new and improved ultrasonic test equipment and methods as
of less than 7.5 in. [190 mm] wall thickness the transducer used
they are developed.
for the inspection will be different than the transducer used for
1.3 This practice is intended to provide a means of inspect-
larger sections.
ing cylindrical forgings so that the inspection sensitivity at the
1.6 Supplementary requirements of an optional nature are
forging center line or bore surface is constant, independent of
provided for use at the option of the purchaser. The supple-
the forging or bore diameter. To this end, inspection sensitivity
mentary requirements shall apply only when specified indi-
multiplication factors have been computed from theoretical
vidually by the purchaser in the purchase order or contract.
analysis, with experimental verification. These are plotted in
Fig. 1 (bored rotors) and Fig. 2 (solid rotors), for a true
1.7 This practice is expressed in both inch-pound units and
inspection frequency of 2.25 MHz, and an acoustic velocity of
in SI units; however, unless the purchase order or contract
5 5
2.30 in. ⁄s × 10 in. ⁄s [5.85 cm ⁄s × 10 cm ⁄s]. Means of con-
specifies the applicable M specification designation (SI units),
verting to other sensitivity levels are provided in Fig. 3.
the inch-pound units shall apply. The values stated in either
(Sensitivity multiplication factors for other frequencies may be
inch-pound units or SI units are to be regarded separately as
derived in accordance with X1.1 and X1.2 of Appendix X1.)
standard. Within the practice, the SI units are shown in
brackets. The values stated in each system are not necessarily
1.4 Considerable verification data for this method have been
exact equivalents; therefore, to ensure conformance with the
generated which indicate that even under controlled conditions
standard, each system shall be used independently of the other,
very significant uncertainties may exist in estimating natural
and values from the two systems shall not be combined.
discontinuities in terms of minimum equivalent size flat-
bottom holes. The possibility exists that the estimated mini-
1.8 This standard does not purport to address all of the
mum areas of natural discontinuities in terms of minimum
safety concerns, if any, associated with its use. It is the
areas of the comparison flat-bottom holes may differ by 20 dB
responsibility of the user of this standard to establish appro-
(factor of 10) in terms of actual areas of natural discontinuities.
priate safety, health, and environmental practices and deter-
This magnitude of inaccuracy does not apply to all results but
mine the applicability of regulatory limitations prior to use.
1.9 This international standard was developed in accor-
1
dance with internationally recognized principles on standard-
This practice is under the jurisdiction of ASTM Committee A01 on Steel,
Stainless Steel and Related Alloys and is the direct responsibility of Subcommittee
ization established in the Decision on Princ
...
This document is not an ASTM standard and is intended only to provide the user of an ASTM standard an indication of what changes have been made to the previous version. Because
it may not be technically possible to adequately depict all changes accurately, ASTM recommends that users consult prior editions as appropriate. In all cases only the current version
of the standard as published by ASTM is to be considered the official document.
Designation: A418/A418M − 15 (Reapproved 2020) A418/A418M − 24
Standard Practice for
Ultrasonic Examination of Turbine and Generator Steel
1
Rotor Forgings
This standard is issued under the fixed designation A418/A418M; the number immediately following the designation indicates the year
of original adoption or, in the case of revision, the year of last revision. A number in parentheses indicates the year of last reapproval.
A superscript epsilon (´) indicates an editorial change since the last revision or reapproval.
1. Scope*
1.1 This practice for ultrasonic examination covers turbine and generator steel rotor forgings covered by Specifications
A469/A469M, A470/A470M, A768/A768M, and A940/A940M. This practice shall be used for contact testing only.
1.2 This practice describes a basic procedure of ultrasonically inspecting turbine and generator rotor forgings. It does not restrict
the use of other ultrasonic methods such as reference block calibrations when required by the applicable procurement documents
nor is it intended to restrict the use of new and improved ultrasonic test equipment and methods as they are developed.
1.3 This practice is intended to provide a means of inspecting cylindrical forgings so that the inspection sensitivity at the forging
center line or bore surface is constant, independent of the forging or bore diameter. To this end, inspection sensitivity multiplication
factors have been computed from theoretical analysis, with experimental verification. These are plotted in Fig. 1 (bored rotors) and
5
Fig. 2 (solid rotors), for a true inspection frequency of 2.25 MHz, and an acoustic velocity of 2.302.30 in. in./s ⁄s × 10 in. in./s⁄s
5
[5.85 cm [5.85 cm/s ⁄s × 10 cm cm/s]. ⁄s]. Means of converting to other sensitivity levels are provided in Fig. 3. (Sensitivity
multiplication factors for other frequencies may be derived in accordance with X1.1 and X1.2 of Appendix X1.)
1.4 Considerable verification data for this method have been generated which indicate that even under controlled conditions very
significant uncertainties may exist in estimating natural discontinuities in terms of minimum equivalent size flat-bottom holes. The
possibility exists that the estimated minimum areas of natural discontinuities in terms of minimum areas of the comparison
flat-bottom holes may differ by 20 dB (factor of 10) in terms of actual areas of natural discontinuities. This magnitude of inaccuracy
does not apply to all results but should be recognized as a possibility. Rigid control of the actual frequency used, the coil bandpass
width if tuned instruments are used, and so forth, tend to reduce the overall inaccuracy which is apt to develop.
1.5 This practice for inspection applies to solid cylindrical forgings having outer diameters of not less than 2.5 in. [64 mm]
[64 mm] nor greater than 100 in. [2540 mm]. It also applies to cylindrical forgings with concentric cylindrical bores having wall
thicknesses of 2.5 [64 mm] in. or greater, within the same outer diameter limits as for solid cylinders. For solid sections less than
15 in. [380 mm] in diameter and for bored cylinders of less than 7.5 in. [190 mm] wall thickness the transducer used for the
inspection will be different than the transducer used for larger sections.
1.6 Supplementary requirements of an optional nature are provided for use at the option of the purchaser. The supplementary
requirements shall apply only when specified individually by the purchaser in the purchase order or contract.
1
This practice is under the jurisdiction of ASTM Committee A01 on Steel, Stainless Steel and Related Alloys and is the direct responsibility of Subcommittee A01.06
on Steel Forgings and Billets.
Current edition approved March 1, 2020May 1, 2024. Published March 2020May 2024. Originally approved in 1957. Last previous edition approved in 20152020 as
A418/A418MA418/A418M – 15 (2020).–15. DOI: 10.1520/A0418_A0418M–15R20.10.1520/A0418_A0418M-24.
*A Summary of Changes section appears at the end of this standard
Copyright © ASTM International, 100 Barr Harbor Drive, PO Box C700, West Conshohocken, PA 19428-2959. United States
1
---------------------- Page: 1 ----------------------
A418/A418M − 24
1
NOTE 1—Sensitivity multiplication factor such that a 10 % indication at the forging bore surface will be equivalent to a ⁄8 in. [3 mm] diameter flat
5 5
bottom hole. Inspection frequency: 2.0 MHz or 2.25 MHz. Material velocity: 2.30 in./s × 10 in./s [5.85 cm/s × 10 cm/s].
FIG. 1 Bored Forgings
1.7 This practice is expressed in both inch-pound
...


Questions, Comments and Discussion
Ask us and Technical Secretary will try to provide an answer. You can facilitate discussion about the standard in here.